I’m a firm believer in workflows working for you (rather than the other way around), so I definitely enjoyed presenting on the recent webcast about CA PPM’s out-of-the-box workflow capabilities.
While everyone can benefit from using CA PPM’s workflow capabilities, some users don’t quite know where to begin—they’re a bit intimidated by the admin side of the tool.
But never fear. You can quickly build a workflow—even if you’ve never done it before—because it really is easy. And I’m here to guide you through the process. In this post, I’ll help you “mind-map” creating a workflow with the basics, recapping some key points and steps to keep in mind. Once you get that foundation down and you realize how simple it can be, everything will seem less terrifying!
Let’s Get Started
Start by verifying that you have added the Global Security Right “Process Access” to your profile.
(How To: Administration à Resources à Search for yourself or the user that needs the security right and open their resource profile à Resource’s Access Rights Tab – Global à Search for “Process Access.” If the user doesn’t have the security right, use the Add button to grant the right.)
Once we have verified the correct security rights have been added, we can create a process. Navigate to Administration à Processes (under the Data Administration header) in CA PPM and click the “New” button. You will be asked to give your process a name and an ID. Once you click “Save and Continue,” you will see all the process tabs across the top of the page. This diagram provides each tab’s definition and relevance.
(The red and blue text signifies the basic elements for building our process knowledge foundation.
The gray text signifies elements that are a little more advanced.)
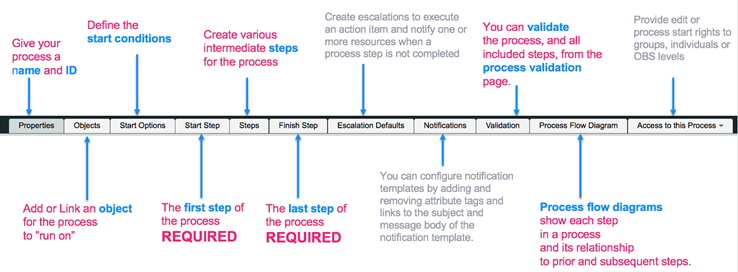
As you create your process, you will proceed in the order of the tabs from left to right. For example, we would first give our process a name and ID on the Properties tab. Next, we would link our process to an object on the Objects tab and then define our start conditions…and so forth.
To help you understand the building blocks of processes and how they connect to the tabs above, I’ve created the diagram below. We start out with a process flow from Start Step to Finish Step with an emphasis on building a foundation and an understanding of Steps, Step Actions, Splits and Joins.
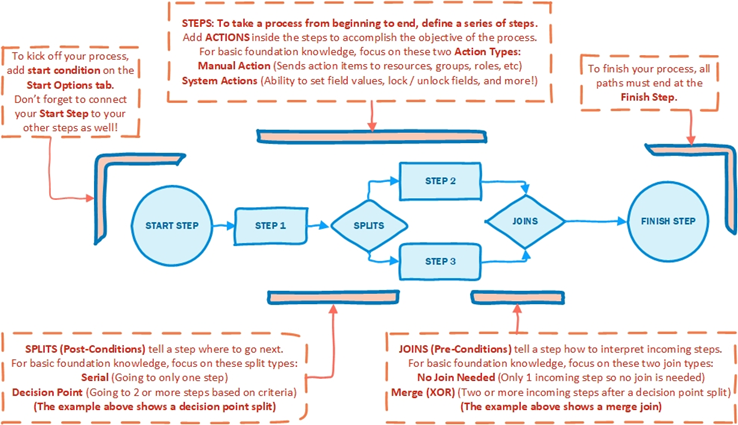
By using the process building blocks illustrated above, you’ll be well on your way to understanding workflows and creating your own.
Hungry for More?
For a step-by-step demonstration of creating a workflow and a more in-depth explanation of the inner workings of CA PPM processes, check out my recent PPM Insights webcast and presentation. You can follow along with the live demo to set up your workflow. Plus, we had some great questions from participants during the Q&A; the answers can give you more practical insights.
Let’s continue this conversation—what questions or comments do you have about CA PPM workflows?