Hello All! May the 4th be with you! Sorry, I couldn't resist
First of all, I wanted to thank AaronBerman and Pashapour for their outstanding help with the CA SSO side of things. I couldn't have done this integration without the CA SSO team help.
I will be sharing what I learned when playing with the new JWT Auth Scheme, which is part of the new CA SSO 12.8. This new CA SSO authentication scheme will provide plenty of new possibilities when comes to Single Sign-On, Federation and token sharing. The CA SSO can accept an id_token (JWS) signed by the CA API Gateway and vice-versa.
Assumptions:
- I assume you have a fully working CA SSO 12.8, CA SSO Access Gateway (former SPS) and a web application/page that's going to be protected. The new CA SSO JWT Auth Scheme needs either the Access Gateway or the SSO SDK and will not work through regular web agents at this point;
- I assume you have a fully working CA API Gateway 9.3 and with the CA Single Sign-On properly configured, pointing to your policy server;
Before we get started, this is an overview of how I built this integration. Please make sure you revisit this diagram to understand what's going on behind the scenes:
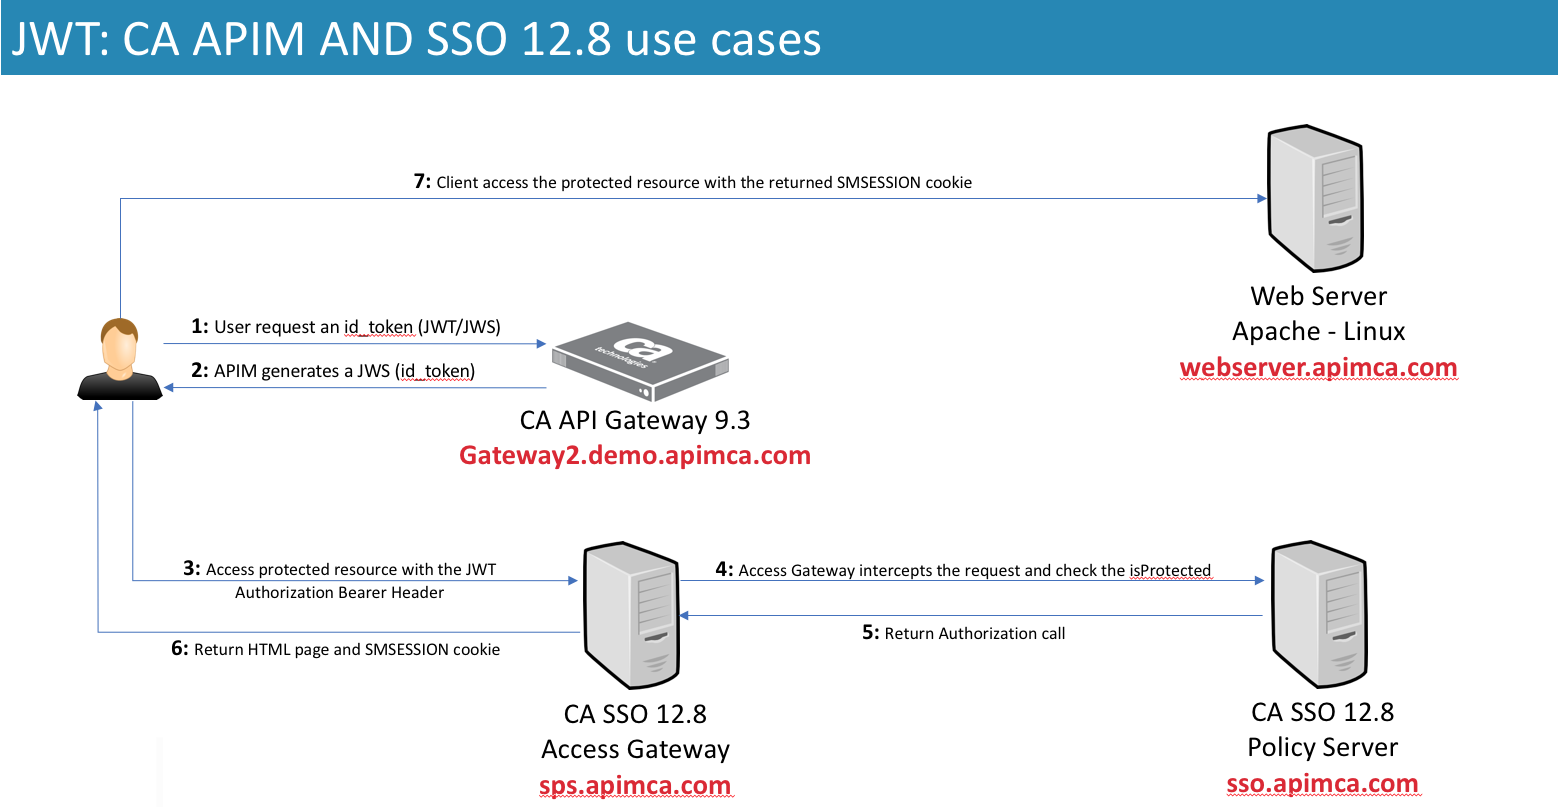
You can find further information on the use cases by visiting this link for CA SSO doc and this link for the CA API Gateway.
Integration at a glance:
With this new JWT authentication scheme, the CA SSO 12.8 can accept an id_token (representing the user) generated by a trusted party and exchange it for a SMSESSION cookie, after the validation. If you want to know more about the JSON Web Signature, please visit this link. In this tutorial, the CA API Gateway will be the one generating an id_token and encoding it into a signed JWT. I also created a new private key, on the CA API Gateway, and imported it into the CA SSO as well. This will allow the CA SSO to validate the JWT as well. As long as both the CA API Gateway and SSO have the certificate being used (private/public key), either one will be able to sign and validate a JWT. Let's jump to the fun part then
Creating a new certificate:
Let's get started by creating a new certificate that's going to be used to sign the JWT payload and turn it into a JWS. As I said before, I will be using the CA API Gateway to generate the certificates but you could be using the CA SSO or any other certificate you want.
1. Launch your Policy Manager and connect to your gateway;
2. With the Policy Manager connected to your API Gateway, navigate to the top menu Tasks > Certificates, Keys and Secrets > Manage Private Keys;
3. Hit the Create button to generate a new certificate. Give it an alias name and click Create:

4. Now select the certificate you created and click on the Properties button. Export its private key and define a password that you can remember later. Make sure to select the *.p12 (PFX) format.

Importing the certificate into the CA SSO:
1. Launch your CA SSO AdminUI and connect using an administrative user (superuser);
2. Once logged in, expand the Infrastructure side menu, then X509 Certificate Management and finally click on Trusted Certificates and Private Keys:

3. Click on the Import New button and select your exported *.p12 file from the previous step. Make sure you do not change the options and keep the default as follows:

4. After clicking Next, enter the password you defined when exporting the certificate from the API Gateway:

5. Give that certi an alias. That alias is important and will be used later when enabling the JWT Auth Scheme on your CA SSO:

6. Confirm the importing in the last screen and click Finish.
Enabling the JWT Authentication Scheme:
Now that we have our certificate in both parties, let's enable the new CA SSO 12.8 JWT Auth Scheme.
1. Yet with your CA SSO AdminUI opened and with a superuser like logged in, navigate to the side menu Infrastructure again, then Authentication and Authentication Schemes. Note that I already have a JWT auth scheme enabled, because I'm using the same environment I use for my demos. You will be creating a new one by clicking on the Create Authentication Scheme button:

2. Click on the OK button to proceed with a creation of a new object:

3. Configure the new auth scheme as follows and remember to use the alias of the certificate you imported previously. The Scheme Setup will define some very important information about your JWS, for example what's the claim that is going to be used to look up for the user, which by default is the "sub"one.:

You could use the kid claim from the JOSE Header instead of typing the certificate alias name. However for this to work you must have imported the certificate with alias that is going to be presented in the kid claim. The JOSE stands for: JSON Object Signing and Encryption and it's the first part of a JWT (correctly called JWS when signed ) and it's very important because it carries information such the algorith used to sign the payload, the Key ID (KID), among other things. One of the commonly information carried by the JOSE header is the JSON Web Key Set set URL. If you have the OTK installed into your gateway, you can open up your browser and navigate to: https://your-gateway:8443/openid/connect/jwks.json.
4. Click Submit to save and add the new JWT Auth Scheme.
Protecting a web resource using the new added JWT Auth Scheme:
At this point we successfully have imported the private key and added the JWT Auth Scheme. Now we need to use this new scheme to protect a resource and then be able to access it, later, after the API Gateway issuing an id_token (JWS). You might need some help from your CA SSO team to do that. I will use a resource I already have in place and being protected by the CA Access Gateway. It's a simple Apache webserver returning a dummy HTML page, printing all the headers. This is my setup on my CA SSO side:

All I had to do was to add a protected realm and use the added JWT Auth Scheme we enabled in the previous step.
CA API Gateway policy work:
It's policy time! We have our CA SSO ready to rock its JWT Auth Scheme. Now we need some policies to create an id_token so we can use it to access the protected resource and get back the SMSESSION cookie. I built a policy to issue a new id_token and encode it in a JWT using the certificate I created. However you can easily change the OTK to use a defined permanent key to sign the JWT and use the OOB OTK REST APIs to get the id_token and propagate it downstream to the CA SSO. At the end of this tutorial you will find all the policies I built. This is an overview of the 2 policies I will be using:
/casso/idtoken:
Basically the idtoken endpoint will accept 3 methods of user authentication:
- An existing and valid SMSESSION;
- Basic HTTP Credentials; or
- An OAuth access_token issued by the OTK
This policy assumes that your gateway is properly configured with your CA SSO. If you don't want to configure the CA SSO agent on the API Gateway, you can tweak this policy to use the CA SSO Authorization Web Services and get the very same results but with an "API only" approach. After authenticates the user I start to build up the payload (assertion #30). The line #39 is encoding the JSON Web Token into a JSON Web Signing (JWS), that's going to be returned into the response. This is how the endoding assertion looks like, note the certificate being used:

/casso/validatejws:

I built that policy to decode a JWS and print out its claims and the payload. You can do the same by using the website https://jwt.io
Action time:
Now the moment of the truth: testing it out! I'm using Paw, an awesome REST client for Mac. But you can use whatever REST client you feel comfortable with. To demo this I will be using basic HTTP Credentials with an user from my CA Directory LDAP store:

That's the decoded JWT using https://jwt.io :

I also hit the validation endpoint I created and got back the decoded payload and other information:

Now let's use the generated JWT and try to access a resource protected by the CA SSO:
First without any authorization header or SMSESSION cookie:

Now passing the generated JWT as an Authorization header (Bearer):

Note that in the picture above the SMSESSION cookie is passed back into the header. You could copy this cookie and use it to either generate another JWT or access another CA SSO protected resource.
I really hope this can help you somehow!