I put this tutorial in as an answer to a question, but there is enough discussion on it I'm separating it into its own thread.
Overview
To create and use a transport protocol handler, you need to:
- Setup your development environment
- Implement the required classes and configuration file
- Deploy your extension
The following sections will illustrate how to do each of these. There is a great deal more you can do, but the purpose of this document is to give you the basics to get started with creating and using custom transport protocol handlers.
Setting Up Your Development Environment
To setup the development environment, we need:
- A Java IDE (Eclipse is used in this tutorial)
- An installation of CA SV (CA SV 7.5.2 is used in this tutorial)
Once the Java IDE and CA SV are installed, we need to setup the IDE to use the SV jar files so we can work with the SV classes within the IDE. To do this we need to put the SV jar files on the classpath for the project we’ll be working with. There are several ways to do this. Here is one example:
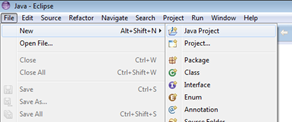
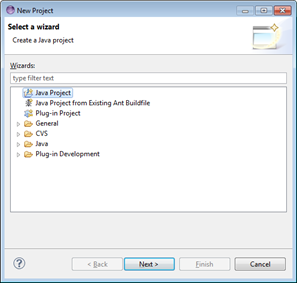
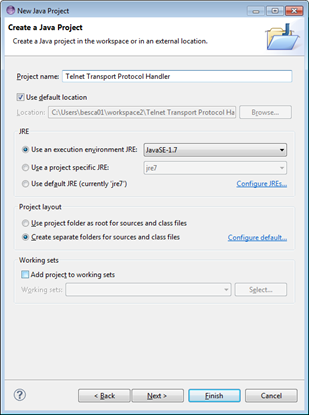
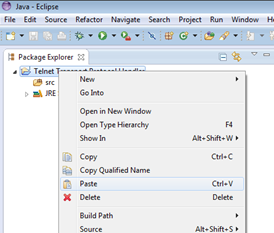
- 1) First create a Java Project using the following steps. Ideally call it something to do with the protocol you want to handler. For example “Telnet Transport Protocol Handler”
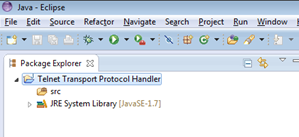
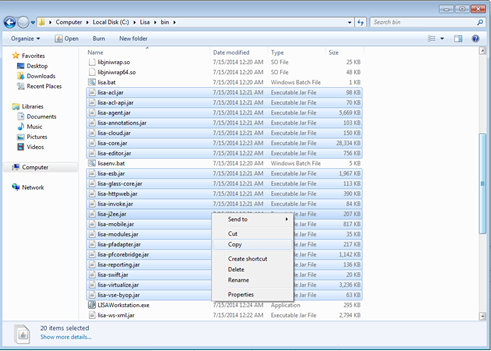
- 2) Copy the SV jar files to the Eclipse project. You’ll find the jars in the bin folder under the SV installation. Note you only need a couple of these jars, but if you copy them all, you won’t have to worry about whether you have the classes you need. Also note that all these jar files will already be on the classpath for the SV installation, so you won’t affect the SV install by having them all available in your project.
Copy the jar files to your project (note you can also drag the jars into the project from the folder, which will copy them):
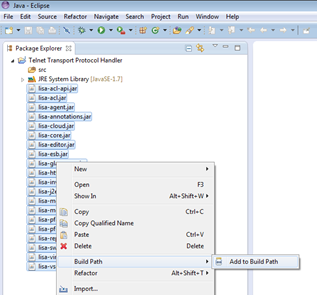
- 3) Add the SV jars to your classpath by selecting all the jar files, right clicking and adding to the build path:
- 4) Copy and add any jars specifically needed for the protocol you want to handle. Use the same steps above to add those jars to the classpath.
Your environment and project is now setup and ready to start implement the Transport Protocol Handler.
Designing and Implementing the Protocol Handler
There are two key parts to designing and implementing a protocol handler:
- Creating the appropriate classes
- Hooking the classes into the SV framework for the application to call
Creating the appropriate classes
The key to designing and creating the right classes for a protocol handler is to realize the virtual service model is just a test case. If we look at a typical model, you’ll see it is made up of a number of test steps. The two key steps that are protocol specific are the listener step (how to receive a request) and the responder step (how to send back the response).
The other key part to a protocol handler is being able to tie all of the classes together and hook it into the workstation in order to select your protocol handler in the list of protocol handlers. You may also need one or more wizard pages to configure the protocol for recording.
To summarize, to create a new protocol handler we need to implement:
- A listener step to listen for new requests
- A responder step to send back the responses
- A class that records transactions and generates the required steps for the model
A listener step to listen for new requests
In Eclipse, create a new class that extends com.itko.lisa.vse.stateful.BaseListenStep. At a minimum you need to implement the following methods:
The getTypeName method will be the name displayed in the GUI if you want to create a new step of this type.
@Override
public String getTypeName() throws Exception {
// TODO Auto-generated method stub
return "FTP Listener";
}
The getName method will indicate the default name to put on the test step when the model is created
@Override
public String getName() {
// TODO Auto-generated method stub
return "FTP Listener Step";
}
The execute step is where you put your code to listen for a request. When the request comes in, create a request object and set the request in the listen step.
@Override
protected void execute(TestExec testExec) throws TestRunException {
Request request = new Request();
request.setBody("This is a request");
setRequest(testExec, request);
}
A responder step to send back the responses
In Eclipse, create a new class that extends com.itko.lisa.vse.stateful.BaseRespondStep. At a minimum you need to implement the following methods:
The getTypeName method will be the name displayed in the GUI if you want to create a new step of this type.
@Override
public String getTypeName() throws Exception {
// TODO Auto-generated method stub
return "FTP Responder";
}
The getName method will indicate the default name to put on the test step when the model is created
@Override
public String getName() {
// TODO Auto-generated method stub
return "FTP Responder";
}
The getResponsePropertyKey method is used to let the parent class know what the preference key is for the response list property.
@Override
protected String getResponsePropertyKey() {
// TODO Auto-generated method stub
return “some.property.for.your.response.list”;
}
The respond method is where you get the responses generated from the service image, and add your code to send each response back to the application.
@Override
protected void respond(TestExec testExec) throws Exception {
List<TransientResponse> responses = getResponseList( testExec );
for( TransientResponse response : responses )
{
handleResponseThinkTime( testExec, response );
sendResponse (response); // replace this with your code here
}
}
A class that records transactions and generates the required steps for the model
In Eclipse, create a new class that extends com.itko.lisa.vse.stateful.protocol.TransportProtocol. At a minimum you need to implement the following methods:
In the beginRecordingProcess method, setup your method to listen for request/response pairs based on the protocol you want to handle, and create transactions as illustrated in the sample method below.
protected void beginRecordProcess(TestExec testExec) throws Exception {
Transaction t = new Transaction();
Request req = t.getRequest();
Response rsp = new Response();
req.setBody("This is a request");
req.setOperation("Operation 1");
req.getMetaData().put( ConversationalStep.SESSION_KEY, "token" );
rsp.setBody("This is a response");
t.addResponse(rsp);
addTransaction(t);
}
In the createListenStep method, create the test step for listening to requests. Note you must create your listen step using RecordingSession.createStep. If you don’t you will get a null pointer when the wizard tries to generate the model
@Override
public TestNode createListenStep(TestCase testCase) {
TestNode listenStep = RecordingSession.createStep( testCase, "FTP Listen", FTPListenStep.class );
return listenStep;
}
In the createRespondStep method, create the test step for sending responses. Note you must create your response step using RecordingSession.createStep. If you don’t you will get a null pointer when the wizard tries to generate the model
@Override
public TestNode createRespondStep(TestCase arg0) {
TestNode responseStep = RecordingSession.createStep( testCase, "FTP Responder", FTPResponseStep.class );
return responseStep;
}
In the endRecordProcess, tear down any connections you have open. Assume the recording session has ended.
@Override
protected void endRecordProcess() {
}
In the getWizardSteps, you define any wizard pages you need in the recorder to configure your protocol for recording. Note returning null indicates there are no pages.
@Override
public WizardStep[] getWizardSteps(RecordingWizard arg0, WizardPhase arg1) {
return null;
}
Hooking the classes into the SV framework for the application to call
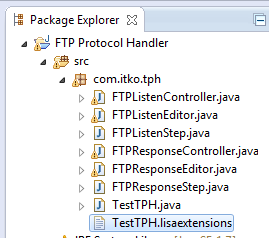
Once you have all the classes created, you need to tell the framework how you want them tied into the workstation. You do this by creating a file with the extension lisaextensions anywhere in the src folder of your project (ideally put it in the same package as the classes to make it easy to find later). The first part of the name can be whatever you want, but should be easy for you to tell what extensions are defined inside. For example, the file may be called TestTPH.lisaextensions and put in the package as follows:
Inside the file, enter the following lines in any text editor (eclipse editor or notepad works great):
nodeCategories=FTP\ Stuff
FTP\ Stuff=com.itko.tph.FTPListenStep\
,com.itko.tph.FTPResponseStep
nodes=com.itko.tph.FTPListenStep,com.itko.tph.FTPResponseStep
- com.itko.tph.FTPListenStep=com.itko.tph.FTPListenController\
,com.itko.tph.FTPListenEditor
- com.itko.tph.FTPResponseStep=com.itko.tph.FTPResponseController\
,com.itko.tph.FTPResponseEditor
vseProtocols=com.itko.tph.TestTPH
- com.itko.tph.TestTPH=Transport,Test TPH2,Testing Transport Handler
Looking at what each line does:
nodeCategory defines a new category of test steps. If you go into a test case, and add a new step, you’ll see the category defined at the bottom of the list.
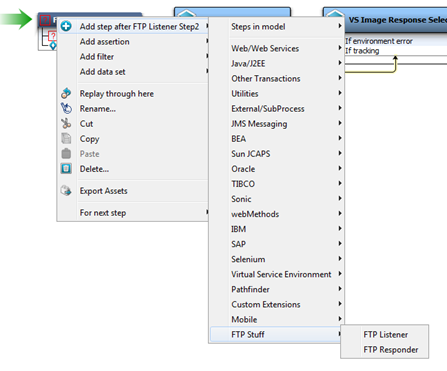
The line with “FTP\ Stuff= “ is defining when steps will be displayed in the FTP Stuff category. Note you need to make sure the name (in this case “FTP\ Stuff”) matches the name you gave the category in the nodeCategory line.
The line with “nodes=” is defining new test steps we can use in the workstation. In this case we want to define a new Listener and Responder step for our protocol.
The line with “com.itko.tph.FTPListenStep=” defines the editor and controller to use for the listen step.
The line with “com.itko.tph.FTPResponseStep=” defines the editor and controller to use for the responder step.
The line with “vseProtocols=com.itko.tph.TestTPH” defines a new protocol handler, which is the class we created to record transactions and generate the required steps for the model.
The lien with “com.itko.tph.TestTPH=Transport,Test TPH2,Testing Transport Handler“ defines:
- what kind of protocol handler we want (in this case a Transport Protocol Handler)
- the name to give it in the list of protocol handlers (in this case “Test TPH2”)
- the description for the handler (“Testing Transport Handler”)
Note this line could be used to define Data Protocol Handlers as well.
Deploying the Protocol Handler
To deploy the new protocol handler, we need to export the project as a jar and copy the jar to the hot deploy directory as follows:
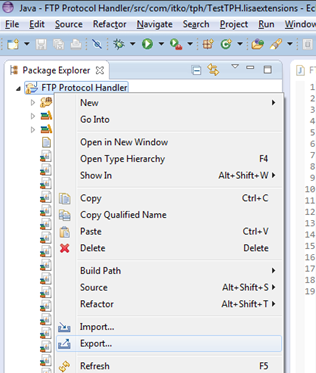
Export the Project as a jar
Right click on your project and choose Export:
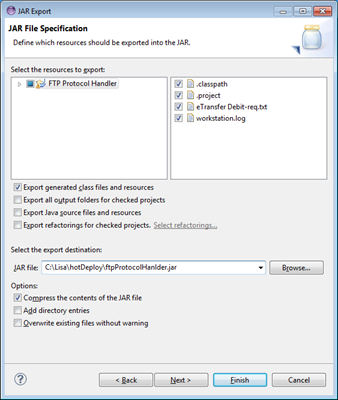
In the export wizard, select “JAR file”:

Select the hotDeploy directory in the CA SV installation directory, and give your jar file a name that will remind you what’s in it. Press Finish.
Your new protocol handler is now deployed. Every time you make a change to the handler, go through these steps to redeploy it. Each time you redeploy, it is recommended you restart your workstation. Once you have finished developing and testing your new protocol handler on your local machine, you will want to push a final change to be used by the team. Keep in mind you need to restart the registry, workstations, and vse in order to pick up the changes.
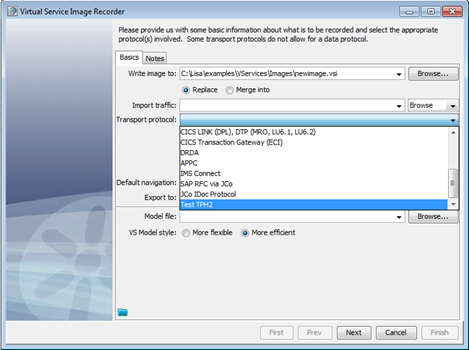
Using the Protocol Handler
You use the protocol handler as you would any other protocol handler. Go into the recording wizard and you’ll see your new protocol handler in the available choices:
When the virtual service is created, you’ll see the new test steps you’ve created:

I've attached a sample project so you can get started. I'd recommend first deploying it as is to see how it works, then start tweaking it for your needs. Note there is much more you can do to improve your transport protocol handler, but these are the basics to get you started.